


The How To Page is for people who want to get their hands dirty, or are thinking about getting them all greased up.
Just watch, learn and ask. Before you know it, you are building your own beauty’s.
These posts will be a combination of collected information from the web and produced by our own.
How To Weld a Café Racer
Welding is something you can learn pretty fast when you set your mind to it. A perfect weld takes a bit more time, but a decent one can come sooner than you think!
Because welding is a common issue when it comes to building Café Racers, we will tackle this subject as well.
The key to produce decent welds, is absorbing a lot of information (How To’s, Video, Guides etc) and trying to take your time to try it out. A lot! Get some scrap metal and just start welding, see how you are doing and improve.
Let’s start with the types of welding.
Oxygen-Acetylene Welding
Oxy-Acetylene welding equipment consists of two large tanks (one containing the oxygen and the other containing the acetylene), a regulator assembly at the top of each Oxy-Acetylene tank, a pair of hoses leading from the regulators to the torch handle and the torch handle itself. The first thing to do is adjust the line pressure, which is controlled by the large wing nut on the front of each regulator. Close both valves on the torch handle (one controls the oxygen and the other controls the acetylene). Then slowly open the large valves at the top of the tanks. It’s a good practice to stand to one side when doing this because the sudden pressure could blow out the face of a defective gauge and send parts flying. Next, open one valve on the torch handle about a half turn, then screw the regulator wing nut in or out until the line pressure reads about 5psi. Close the valve, then adjust the other line to the same pressure.
Use a No. 2 or No. 3 welding tip, and begin by experimenting with a piece of scrap metal. The basic idea is to use the torch to create a small puddle of molten metal on the work, then put the end of the welding rod into the puddle. This melts the rod, causing it to mix with the molten metal, which bonds the two pieces together. If you do that correctly, you will have made a good weld. If you don’t apply enough heat to get the work to puddle, but instead quickly melt the rod onto the work, the weld will not hold.
If you apply too much heat to a single spot you’ll melt away the work entirely, leaving a large hole. Good technique involves adjusting the torch to the correct intensity for the thickness of the work, creating a good puddle, and moving the puddle along at the correct rate as you feed the correct amount of rod. Although we’re describing gas welding, the same type of puddling must also occur with arc or mig welding. A feel for that comes only with practice.
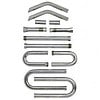
No matter how you try, you cannot make a good weld unless you correctly adjust the torch.Figure 1 shows four types of flames. The difference between them is caused by the relationship between the amount of oxygen and acetylene, which is controlled by the two valves on the torch handle. The flame you’re after is the neutral flame which comes just as the acetylene feather of the carburizing flame disappears into the inner cone. The correct intensity is determined by the thickness of the work and by how rapidly you move the puddle along. Beginners tend to do better with a lower flame because it allows them to work more slowly.
Figures 2, 3 and 4 show how to hold and move the torch. Angle the flame toward the work with the rod coming in from the opposite direction. Once the puddle forms, move the torch in circular or semicircular patterns across the weld as you slowly advance the puddle. Continue to feed the rod, but don’t force it into the work or it’ll stick. When things start flowing correctly, you’ll know it’s right.
Check this introduction to Oxygen-Acetylene Welding
Arc Welding
Like adjusting the intensity of the flame with gas-welding, with arc-welding you’ll have to set the heat range by changing the amperage setting on the welder. This is done either with a dial or by plugging the hot lead into one of several fixed-amperage receptacles on the welder. As a general rule, use 5/32-inch rod and 75 amps on 1/8-inch material, changing to 100 amps for ¼-inch material. Thinner (1/16-inch) material is more difficult to weld and you’ll have to experiment with smaller rod and lower heat ranges (amp settings).
Although what you’re after is basically the same, technique is different with arc-welding. You have to establish an arc, which melts the work and the rod simultaneously and deposits the rod on the work. To establish an arc, simply scratch the end of the electrode (rod) across the work, just like a match. (With a mig welder, you simply hold the tip close to the work and pull the trigger.)
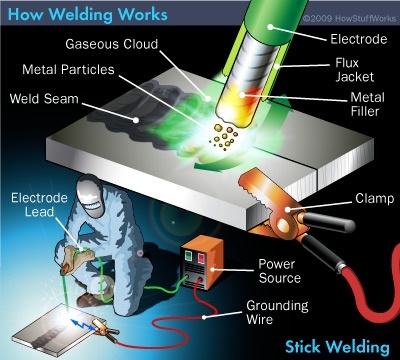
As soon as the spark jumps, move the tip of the electrode slightly away from the work, then move the arc over to the weld and begin welding. If you move the electrode too far away you’ll break the arc. If it’s too close, the electrode will stick to the work, which probably will happen several times before you get the hang of it. A good arc has a crisp, crackling sound.
It’s good practice to lead the arc with the electrode just a little so you can see the puddle develop. Keep in mind that the electrode continues to melt away so you’ll have to move it closer to the work as you weld. Move the electrode along the weld slowly, allowing the molten puddle to follow. If you move too rapidly the puddle will not fully develop and the weld will be weak. Figure 5 shows the arc weld graphically. Also, take a look at the videos showing tips for arc welding by following the links at the bottom of this page.
A short (and a bit corny) movie about Arc Welding for beginners!
Mig Welding
Mig welding is by far the easiest to learn. With a few minutes of practice, you’ll be making professional welds. Mig welding is similar to arc welding, but the wire is automatically fed from the end of the gun at a preset rate. A gas bottle provides gas, which is expelled from the end of the gun to shield the weld from the ambient atmosphere and avoid the oxidation caused by oxygen. You can make unshielded welds (without gas), but the welds will be highly oxidized which will make them weak and brittle. If your system is not equipped with gas, you must use flux cored wire to avoid highly oxidized welds. The key to good mig welding is to set the wire feed-rate and the electric arc intensity at the correct values for the material. You can do this only by experimentation. The size of the wire in mig welding is also important, and the tip must match the wire size. Follow the instructions that came with your machine. Your machine will probably come with tips and wire for thin-wall material (roughly 0.0625 to 0.120 inch thick). You might have to buy larger wire and the appropriate tip for thicker material. For additional information on setting the wire feed rate and the heat range, as well as techniques of applying the weld, take a look at the online videos linked below. The first three links are for mig welding, and the last two are for arc welding.
Movie about Mig Welding
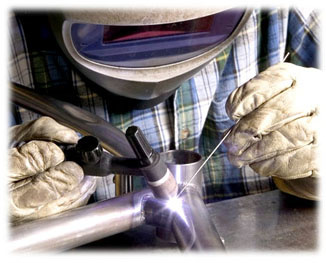
Tig Welding
Tungsten inert gas (TIG) welding is the process of blending together reactive metals, such as magnesium and aluminum. During the welding process, an arc is formed between a pointed
tungsten electrode and the area to be welded. A shielding gas is used to help create a clean weld, as it prevents oxidization from occurring. The welding method became popular and useful in the early 1940s and, as a result, has greatly propelled the use of aluminum for welding and structural processes.
It is commonly used for both high quality and manual welding.

The type of gas shielding typically used for TIG welding is argon, helium, or a combination of both. When combined, these two gases can ensure a higher weld ing speed and welding penetration. Argon is usually preferred by most welders simply because it is heavier than air and provides better coverage when welding.
Using the TIG welding process, a person can perform a variety of weld types on a number of different metals, although steel and aluminum are the most widely used. A filler rod, usually made from the same material as the base metal, is used for reinforcing joints and welding heavy metals.
Check out this welding channel on youtube, and also this introduction Tig Welding.
Sources used:
Rgriley.com
Wisegeek.com
Youtube
I hope this made you a real welding genius and you will be making your exhausts, frames etc. asap!
If you need extra guides to read before you go to bed, you can click here!
Good luck!